Trong bài viết này mình sẽ hướng dẫn các bạn sử dụng ListView trong Android, ListView trong bài này là ListView mặc định có trong Android, trong bài viết sau mình sẽ hướng dẫn các bạn Custom ListView (tự làm mới ListView theo ý mình).
ListView là gì?
ListView là một view group, hiển thị các thành phần (elements) theo một danh sách, có thể cuộn được theo chiều ngang hoặc thẳng đứng. ListView là một view quan trọng, nó được sử dụng rất nhiều trong các ứng dụng Android. Một ví dụ đơn giản của ListView là cuốn sách liên lạc của bạn, nơi bạn có một danh sách các địa chỉ liên lạc của bạn hiển thị trong một ListView.
Ngoài ListView, Android cũng cung cấp cho bạn một view tương tự khác là ExpandableListView.
ListItem
Một ListView được tạo từ một danh sách các ListItem. ListItem là một dòng (row) riêng lẻ trong listview nơi mà dữ liệu sẽ được hiển thị. Bất kỳ dữ liệu nào trong listview chỉ được hiển thị thông qua listItem. Có thể coi listview như là một nhóm cuộn của các ListItem.
Một ListItem là một mảnh giao diện, nó có thể được làm bởi một số View.
Adapter (Bộ tiếp nối)
Android Adapter (Tạm dịch là bộ tiếp nối) là một cầu nối giữa các View (ví dụ như ListView) và các dữ liệu cơ bản cho View đó. Một Adapter quản lý dữ liệu và ghép nối với các dòng riêng lẻ (ListItems) của view.
Chúng ta ràng buộc các Adapter với Android ListView thông qua phương thức setAdapter. Bây giờ, Chúng ta hãy xem làm thế nào Adapter làm việc với sự giúp đỡ của hình ảnh sau đây.

AdapterView
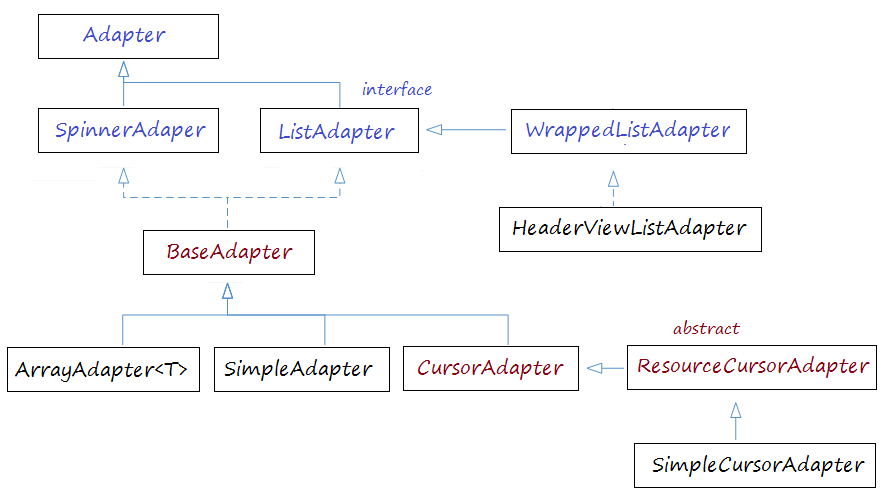
Có nhiều View cần tới Android Adapter để quản lý dữ liệu hiển thị, các View này là con của class AdapterView, bạn có thể xem ở hình minh họa dưới đây:

Android Adapter

Ví dụ ListView với ArrayAdapter
Tạo mới Project với tên ListViewDemo, tham khảo code dưới đây:
Trong ví dụ này bao gồm 1 ListView hiển thị danh sách Item và 1 TextView dùng để hiển thị vị trí và giá trị của phần tử được chọn trong ListView.
![Ví dụ ListView với ArrayAdapter [ntcde.com]Huong-dan-su-dung-ListView-trong-Android8](https://res.cloudinary.com/dwcdztgxn/image/upload/v1565973208/2dev4u.comHuong-dan-su-dung-ListView-trong-Android8_uhkmoq.png)
<?xml version="1.0" encoding="utf-8"?>
<LinearLayout xmlns:android="http://schemas.android.com/apk/res/android"
    xmlns:tools="http://schemas.android.com/tools"
    android:layout_width="match_parent"
    android:layout_height="match_parent"
    android:orientation="vertical"
    android:paddingBottom="@dimen/activity_vertical_margin"
    android:paddingLeft="@dimen/activity_horizontal_margin"
    android:paddingRight="@dimen/activity_horizontal_margin"
    android:paddingTop="@dimen/activity_vertical_margin"
    tools:context="com.dev4u.listviewdemo.MainActivity">

    <TextView
        android:id="@+id/txt"
        android:layout_width="match_parent"
        android:layout_height="wrap_content"
        android:gravity="center"
        android:text="ListView Demo"
        android:textSize="20dp"
        android:textStyle="bold" />

    <ListView
        android:id="@+id/lvData"
        android:layout_width="match_parent"
        android:layout_height="match_parent"></ListView>
</LinearLayout>
File MainActivity.java
package com.dev4u.listviewdemo;

import android.os.Bundle;
import android.support.v7.app.AppCompatActivity;
import android.view.View;
import android.widget.AdapterView;
import android.widget.ArrayAdapter;
import android.widget.ListView;
import android.widget.TextView;

public class MainActivity extends AppCompatActivity {

    ArrayAdapter<String> adapter;
    ListView lvData;
    TextView tvSelection;
    String[] arrData;

    @Override
    protected void onCreate(Bundle savedInstanceState) {
        super.onCreate(savedInstanceState);
        setContentView(R.layout.activity_main);
        //0. Lấy đối tượng textview từ file xml bằng id
        tvSelection = (TextView) findViewById(R.id.tvSelection);
        // 1. Lấy đối tượng listview từ file xml bằng id
        lvData = (ListView) findViewById(R.id.lvData);
        // 2. Khởi tạo dữ liệu cho mảng được hiển thị
        arrData = new String[]{"Item1", "Item2", "Item3", "NTCDE"};
        // 3. Khởi tạo adapter
        adapter = new ArrayAdapter<String>
                (this, android.R.layout.simple_list_item_1, arrData);
        // 4. Đưa adapter vào listview
        lvData.setAdapter(adapter);
        adapter.notifyDataSetChanged();
        // 5. Hiển thị vị trí và giá trị của phần tử được chọn trong ListView lên TextView
        lvData.setOnItemClickListener(new AdapterView.OnItemClickListener() {
            @Override
            //đối số position là vị trí phần tử trong mảng String được khởi tạo (arrData)
            public void onItemClick(AdapterView<?> parent, View view, int position, long id) {
                tvSelection.setText("Vị trí : " + position + " ; Giá trị: " + arrData[position]);
            }
        });
    }

}
File AndroidManifest.xml
<?xml version="1.0" encoding="utf-8"?>
<manifest xmlns:android="http://schemas.android.com/apk/res/android"
    package="com.dev4u.listviewdemo">

    <application
        android:allowBackup="true"
        android:icon="@mipmap/ic_launcher"
        android:label="@string/app_name"
        android:supportsRtl="true"
        android:theme="@style/AppTheme">
        <activity android:name=".MainActivity">
            <intent-filter>
                <action android:name="android.intent.action.MAIN" />

                <category android:name="android.intent.category.LAUNCHER" />
            </intent-filter>
        </activity>
    </application>

</manifest>
Trong bài sau mình sẽ hướng dẫn các bạn custom listview trong android nhé.
Lời Kết
Nhìn toàn bộ bài viết thì có vẻ dài dòng khó hiểu nhưng mà mình chỉ muốn các bạn nắm vững hơn một chút về lý thuyết, còn về ví dụ listview mặc định trong android thì nhìn qua chắc các bạn sẽ hiểu ngay. Nếu có thắc mắc gì bạn hãy để lại comment phía dưới mình sẽ trả lời cho bạn ngay, hoặc gửi mail về [email protected] mình sẽ giải đáp thắc mắc của bạn trong tầm hiểu biết của mình. Xin cảm ơn!
[…] sẽ làm chung với project với ví dụ về listview trong hướng dẫn sử dụng ListView trong Android ở bài trước. Dưới đây là một ví dụ đơn giản về Custom ListView với […]