
Ở part 1 mình đã hướng dẫn các bạn cách tạo web service với php và mysql cho phương thức GET và cách parse json trong android với retrofit. Ở part 2 mình sẽ hướng dẫn các bạn tạo web service cho phương thức POST bằng php và mysql.
Với phương thức GET thì dữ liệu được thấy trên URL thì phương thức POST thì hoàn toàn ngược lại, POST sẽ gửi dữ liệu qua một trường nhập vào trong android và được nhận dạng ở server thông qua tên (name) của các input đó. Chúng ta sẽ thực hiện tiếp với ví dụ ở part 1, các trường nhập vào là name, age, nclass còn id thì mình đã thiết lập tự động tăng trên database nên có thể để null.
Tạo Web Service cho phương thức POST
Để server nhận được dữ liệu bạn gửi từ client android, bạn phải viết phương thức POST bằng web service để server có thể hiểu và nhận thông tin bạn gửi lên. Chúng ta sẽ viết tiếp vào trong file api.php ở part 1
Thêm đoạn code được đánh dấu dưới đây vào file api.php
<?php
DEFINE('DB_USER', 'root');
DEFINE('DB_PASSWORD', '');
DEFINE('DB_HOST', '127.0.0.1');
DEFINE('DB_NAME', 'students_manager');
$mysqli = @mysql_connect(DB_HOST, DB_USER, DB_PASSWORD) OR die('Could not connect to MySQL');
@mysql_select_db(DB_NAME) OR die('Could not select the database');
mysql_query("SET NAMES 'utf8'");


if (isset($_POST["name"], $_POST["age"], $_POST["nclass"])) {
    $n = trim($_POST["name"]);
    $a = trim($_POST["age"]);
    $c = trim($_POST["nclass"]);
    if (empty($n) || empty($a) || empty($c)) {
        echo ("Vui lòng nhập đầy đủ thông tin");
    } else {
        //$query = "INSERT INTO students (name, age, nclass) VALUES ('" . $_POST["name"] . "', '" . $_POST["age"] . "', '" . $_POST["nclass"] . "')";
        $query = "INSERT INTO students (name, age, nclass) VALUES ('" . $n . "', '" . $a . "', '" . $c . "')";
        $res = mysql_query($query);
        if ($res) {
            echo ("Thêm sinh viên thành công");
        } else {
            echo ("Thêm sinh viên thất bại");
        }
    }
    goto end;
} else if (isset($_GET["id"])) {
    if ($_GET["id"] == "") {
        echo ("Vui lòng nhập id");
        goto end;
    } else {
        $query = "SELECT * FROM students WHERE id='" . $_GET["id"] . "'";
        $resouter = mysql_query($query);
    }
} else {
    $query = "SELECT * FROM students";
    $resouter = mysql_query($query);
}
$temparray = array();
$total_records = mysql_num_rows($resouter);
if ($total_records >= 1) {
    while ($row = mysql_fetch_assoc($resouter)) {
        $temparray[] = $row;
    }
}
echo json_encode($temparray);
end:
?>
Mình sẽ giải thích một chút ở đoạn code trên. Từ client (Android) sẽ nhập vào 3 trường name, age, nclass và được nhận dạng ở server thông qua tên của 3 trường này với phương thức POST.
- Function trim() được sử dụng trim($_POST[“name”]) giống như trong android nó có tác dụng là xóa khoảng trắng của một chuỗi ký tự.
- Function empty() để kiểm tra nếu chuỗi đó là rỗng thì sẽ thông báo cho người dùng .
Mấy cái bạn có thẻ xử lý trong app android hoặc ở phía sever tùy ý, miễn sao thấy hợp lý là được.
Để kiểm tra hàm POST vừa viết lúc nãy đã được chưa thì bạn sử dụng PostMan mình có giới thiệu ở part 1 để kiểm tra xem nó có hoạt động không.
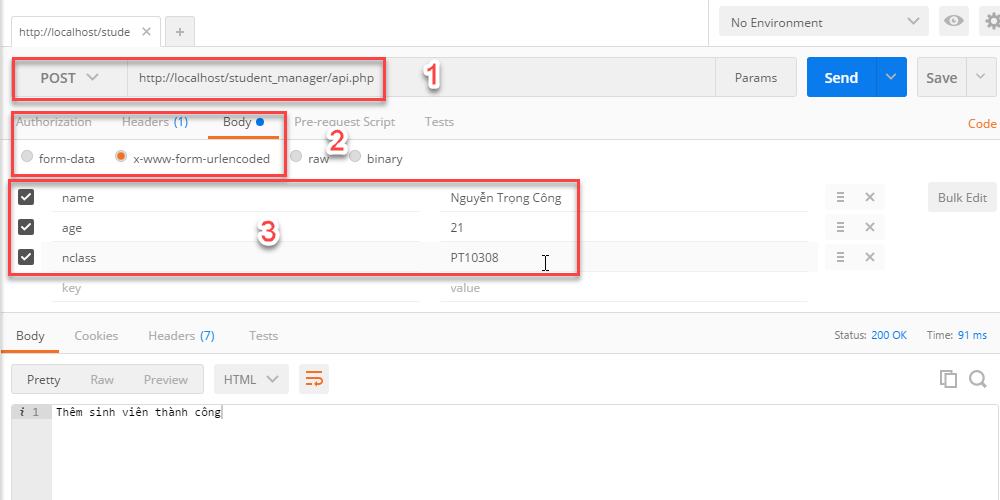
- Chọn phương thức POST và nhập vào địa chỉ đường dẫn
- Chọn tab Body –> chọn tiếp x-www-form-urlencoded
- Nhập key và value vào, key phải đúng theo tên của các trường nhận ở server
- Bấm Send để xem thông báo trả về, để chắc chắn có được hay không thì bạn vào database xem cho chắc

Sử dụng phương thức POST với Retrofit trong Android
Để ở phía server nhận được thì bạn cần POST ở client, chúng ta tiếp tục sử dụng retrofit để POST lên.
package com.dev4u.ntc.webservice.webservice;

import com.dev4u.ntc.webservice.models.Student;

import java.util.List;

import okhttp3.ResponseBody;
import retrofit2.Call;
import retrofit2.http.Field;
import retrofit2.http.FormUrlEncoded;
import retrofit2.http.GET;
import retrofit2.http.POST;
import retrofit2.http.Query;

/**
 * IDE: Android Studio
 * Created by Nguyen Trong Cong  - NTCDE.COM
 * Name packge: com.dev4u.ntc.webservice.models
 * Name project: WebService
 * Date: 3/24/2017
 * Time: 17:52
 */

public interface APIService {
    // GET students from server
    // Server return json array
    @GET("/student_manager/api.php")
    Call<List<Student>> getStudents();

    // GET student by id student from server
    // Server return json object
    @GET("/student_manager/api.php")
    Call<List<Student>> getStudent(@Query("id") String id);

    // POST student from client to server
    // Server return string
    @FormUrlEncoded
    @POST("/student_manager/api.php")
    Call<ResponseBody> insertStudent(@Field("name") String name, @Field("age") int age, @Field("nclass") String nclass);
}
Ở client sẽ gửi lên name, age, nclass nên ta dùng @Field của retrofit và phải đi kèm với @FormUrlEncoded , sau khi POST lên thì client nhận về một String thông báo nên ta dùng Call<ResponseBody> để nhận String.
Viết hàm InsertStudent trong android
Hàm này sẽ gọi hàm insertStudent vừa tạo trong Interface APIService và truyền vào name, age, nclass để post lên server.
    private void insertStudent(String name, int age, String nclass) {
        mAPIService.insertStudent(name, age, nclass).enqueue(new Callback<ResponseBody>() {
            @Override
            public void onResponse(Call<ResponseBody> call, Response<ResponseBody> response) {
                try {
                    String status = response.body().string().toString().trim();
                    Log.e("response", status);
                    if (status.length() > 0) {
                        getAllStudents();
                        Toast.makeText(getBaseContext(), status, Toast.LENGTH_LONG).show();
                    } else {
                        tvResult.setText(response.body().string());
                    }
                } catch (Exception e) {
                    Log.e("onResponse", "Error");
                    e.printStackTrace();
                }
            }

            @Override
            public void onFailure(Call<ResponseBody> call, Throwable t) {
                Log.e("onFailure", t.toString());
            }
        });
    }
Mình chỉnh sửa activity_main.xml một chút, cho nó thêm một cái Button, khi bấm vào button sẽ hiển thị một Custom Dialog nhập vào các trường cần thiết, bạn có thể xem qua bài viết Hướng dẫn Custom Dialog sử dụng XML Layout trong Android
    private void displayInsertDialog() {
        LayoutInflater inflater = getLayoutInflater();
        View alertLayout = inflater.inflate(R.layout.layout_custom_dialog, null);
        final EditText edStudentName, edStudentAge, edStudentClass;
        edStudentName = (EditText) alertLayout.findViewById(R.id.edName);
        edStudentAge = (EditText) alertLayout.findViewById(R.id.edAge);
        edStudentClass = (EditText) alertLayout.findViewById(R.id.edClass);

        AlertDialog.Builder alert = new AlertDialog.Builder(this)
                .setTitle("Insert a new student")
                .setView(alertLayout)
                .setCancelable(false)
                .setNegativeButton("Cancel", new DialogInterface.OnClickListener() {

                    @Override
                    public void onClick(DialogInterface dialog, int which) {
                        Toast.makeText(getBaseContext(), "Cancel", Toast.LENGTH_SHORT).show();
                    }
                })
                .setPositiveButton("Insert", new DialogInterface.OnClickListener() {

                    @Override
                    public void onClick(DialogInterface dialog, int which) {
                        // code for insert student
                        String name = edStudentName.getText().toString();
                        String age = edStudentAge.getText().toString();
                        String nclass = edStudentClass.getText().toString();
                        if ("".equals(name) || "".equals(age) || "".equals(nclass)) {
                            Toast.makeText(MainActivity.this, "Vui lòng nhập đầy đủ thông tin", Toast.LENGTH_LONG).show();
                        } else insertStudent(name, Integer.parseInt(age), nclass);
                    }
                });
        alert.create().show();
    }

Để xem chi tiết hơn bạn có thể download mã nguồn mình để ở cuối bài viết.
Qua Part 2 Hướng dẫn tạo Web Service bằng PHP và MYSQL cho ứng dụng di động này bạn có thể hiểu đơn giản về cách tạo web service cho android cũng như cách tạo phương thức POST, GET ở server và cả ở client, sử dụng retrofit để parse json và get dữ liệu từ sever cũng như post dữ liệu từ android đến server.
Bài viết còn hơi loằng ngoằng và ngôn từ chưa được mạch lạc lắm, mong các bạn bạn có thể bỏ qua :D. Xin chân thành cảm ơn các bạn đã ghé xem blog của mình.
Project on Github: https://github.com/trongcong/WebServiceAndroid
Cám ơn ad ạ, ad cũng học Fpoly phải ko ạ
Rất vui vì bài viết giúp ích cho bạn, ad là cựu sinh viện Poly Đà Nẵng đây 😀